Introduction
The performance of a Capillary Electrophoresis (CE) capillary can be significantly affected by the quality of the cut at each end of the capillary. Improper cutting techniques may create jagged edges, fractures, partial blockages, or irregular end surfaces that can negatively impact sample introduction, current stability, separation efficiency, and overall method reproducibility.
Fused silica capillaries should always be cleaved using proper techniques designed to produce a clean, perpendicular break with minimal stress on the capillary wall. A properly cleaved capillary helps ensure consistent analytical performance and can extend capillary service life. The procedure below can be used for Simplus™ CE Capillaries and other bare fused silica capillaries used in Capillary Electrophoresis applications.
Why Proper Capillary Cleaving Matters
A clean capillary end is important because it can help:
- Improve injection reproducibility
- Maintain consistent electroosmotic flow (EOF)
- Reduce turbulence at the capillary inlet
- Minimize capillary breakage
- Improve peak shape and analytical performance
- Extend capillary operating life
- Reduce troubleshooting caused by damaged capillary ends
Even a small defect at the capillary tip may adversely affect sensitive CE analyses.
Recommended Fused Silica Capillary Cleaving Procedure
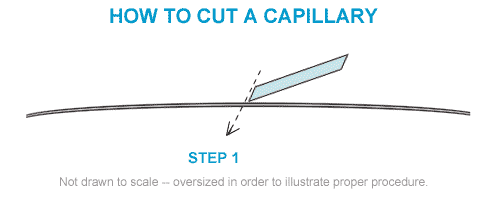
Step 1: Position the Capillary
Place the capillary over a large-radius surface such as:
- A large pipe
- A cylindrical tube
- Another smooth curved support
The large radius helps distribute stress evenly during the cleaving process.
Step 2: Apply Light Tension
Maintain slight tension on the capillary while preparing the score line. Excessive force is not necessary and may lead to an uneven break.
Step 3: Prepare the Cleaving Tool
Use a fresh, clean cleaving stone or scoring tool. Position the cleaving tool at approximately a 30-degree angle relative to the capillary surface.
Step 4: Score the Polyimide Coating
Gently draw the edge of the cleaving stone across the capillary.
The objective is to:
- Penetrate the polyimide coating
- Create a clean score mark
- Avoid excessive pressure
Do not attempt to cut completely through the capillary with the cleaving tool.
Step 5: Complete the Cleave
With the capillary still under slight tension, pull the capillary horizontally until it breaks cleanly at the scored location. A proper break should produce a flat, clean capillary end.
Step 6: Inspect the Cleaved End
Examine the capillary end whenever possible.
A properly cleaved capillary should exhibit:
- A smooth end face
- Minimal chipping
- No visible fractures
- A square, perpendicular break
Step 7: Repeat if Necessary
If the capillary does not break cleanly or fails to separate:
- The polyimide coating may not have been adequately scored.
- Repeat the scoring process using a fresh section of capillary.
- Verify that the cleaving stone is clean and in good condition.
Common Causes of Poor Cleaves
Improper capillary cuts are often caused by:
- Excessive scoring pressure
- Dull or contaminated cleaving stones
- Insufficient scoring of the polyimide coating
- Pulling the capillary vertically rather than horizontally
- Excessive tension during cleaving
- Using damaged capillary sections
Avoiding these common issues can improve success rates and reduce capillary waste.
Best Practices for CE Laboratories
To obtain the most consistent results:
- Use a clean, sharp cleaving stone.
- Score the capillary lightly.
- Maintain only slight tension.
- Pull horizontally when separating the capillary.
- Inspect capillary ends before installation.
- Re-cleave any capillary showing chips, cracks, or uneven surfaces.
- Store capillaries properly when not in use.
Following standardized cleaving procedures can help improve reproducibility while minimizing unnecessary capillary replacement costs.
Conclusion
Properly cleaving a fused silica capillary is one of the most important yet often overlooked steps in Capillary Electrophoresis. A clean, square capillary end supports reliable sample introduction, consistent separations, and long-term capillary performance. By using proper scoring techniques, maintaining slight tension, and inspecting each cut, laboratories can improve CE method reliability and maximize capillary lifespan.